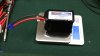
Emtea, did you try to solder onto the PCB while it was in the position of this picture? I can tell you that I'm pretty decent with a soldering iron and there is no way I'd be able to do it like this. I needed to remove the plastic housing around the PCB in order to complete the job. The front plastic housing was still loosely connected due to rubber grommets connected to the motor wires. I just tied some string to it and pulled it out of the way while I was soldering. Secondly, I could tell from your pic that your gps wire would work. Just some cosmetic melting on the protective sheath around the wire. I wouldn't sweat it. I do that kind of stuff all the time. Look at my picture again. I melted the plastic housing that contains the battery contacts! Thankfully I didn't melt it to the point of the battery contacts moving and no longer lining up correctly.
In the end, I wouldn't be too hard on yourself. This isn't an easy job by any means. It takes a steady hand and some extra preparation due to all the things that are in the way - speaking of which, the gps wire is completely removeable. It plugs into the gps and the PCB so you can have it removed and out of the way for the soldering job. I think you are doing it right with the 100 watt iron. Usually I keep things a little cooler when dealing with circuit boards, but this area of the PCB is almost completely "off" the PCB with that big battery contact surface. You need to solder at least a 16 gauge wire on there so a thin flat top with a hot iron is my suggestion.
Either way, I can understand not wanting to go this route. For future reference, here are some tips I've picked up over the years from soldering with R/c.
Think about the job ahead of time and what it would take to remove as many things as possible away from the heat so as nothing gets damaged.
Scuff your surface that you are soldering to. Clean it with some rubbing alcohol.
Get some good solder. Here is the stuff I use. It is cheap and hasn't failed me yet. Alpha Fry AT-31604 60-40 Rosin Core Solder (4 Ounces)
Alpha Fry AT-31604 60-40 Rosin Core Solder (4 Ounces) - - Amazon.com
Tin your iron. Tin the soldering surface. Tin the wire. When you touch all 3 together, you'll get a great transfer of heat and the wire will melt right into the soldering surface fast.