

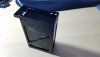
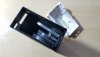
Thought I would share how I made a dead battery into a storage container for filters,parts,cables,etc. I have seen various 3D printed battery shaped storage solutions but without a 3D printer currently in my inventory don't really have that option, I'm sure plenty of you are in the same boat. Also I'm sure more then a few of you have a dead battery.
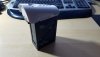
Step one taking the battery apart:
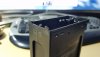
I'm sure you have all seen how this is done. You have the 2 tabs in plain view on each end as well as the 8 hidden under the top cover. Once a part I also split the lower halves apart. This just makes it easier to remove the guts of the battery.
Step two reassembly:
I used an epoxy what I'm sure other glues will work. Take the metal skins that surround the battery cells and glue them to the lower halves. I also glued the rubber bottom piece in, I'm sure you could cut something else to fit if you desired to do so. Place some glue onto tabs that hold the two lower halves together and snap them back together. Allow glue to dry.
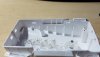
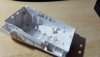
Step three completing the project:
Really this could be before step 2 I guess just the way I did it. Shave the 4 outer most tabs from the top cover leaving the 4 inner ones. File or shave the 2 tabs on each end of the lower half. If you choose to do so label it sticker it up..do as you please. Fill it up with you parts and pieces ,snap the top on and stuff it in your case.
To remove the top just give it a light squeeze in the middle of the lower half while pulling on the top and it will pop right off.
Step one taking the battery apart:
I'm sure you have all seen how this is done. You have the 2 tabs in plain view on each end as well as the 8 hidden under the top cover. Once a part I also split the lower halves apart. This just makes it easier to remove the guts of the battery.
Step two reassembly:
I used an epoxy what I'm sure other glues will work. Take the metal skins that surround the battery cells and glue them to the lower halves. I also glued the rubber bottom piece in, I'm sure you could cut something else to fit if you desired to do so. Place some glue onto tabs that hold the two lower halves together and snap them back together. Allow glue to dry.
Step three completing the project:
Really this could be before step 2 I guess just the way I did it. Shave the 4 outer most tabs from the top cover leaving the 4 inner ones. File or shave the 2 tabs on each end of the lower half. If you choose to do so label it sticker it up..do as you please. Fill it up with you parts and pieces ,snap the top on and stuff it in your case.
To remove the top just give it a light squeeze in the middle of the lower half while pulling on the top and it will pop right off.
Attachments
-
 20181211_163045.jpg2 MB · Views: 48
 -
 20181211_163116.jpg1.9 MB · Views: 49
 -
 20181211_163127.jpg2 MB · Views: 50
 -
 20181211_163137.jpg2 MB · Views: 50
 -
 20181211_163151.jpg1.9 MB · Views: 50
 -
 20181211_163201.jpg2.2 MB · Views: 50
 -
 20181211_163352.jpg1.9 MB · Views: 47
 -
 20181211_163424.jpg2 MB · Views: 50
 -
 20181211_163430.jpg2.2 MB · Views: 47
Last edited: