Welcome Inspire Pilots!
Join our free DJI Inspire community today!
Sign up

Inspire 1 - Photo Quality Large Print

Joined
Jun 23, 2017
Messages
113
Reaction score
25
Age
33
Good afternoon,

I am currently considering selling prints of my work, I was trying to link up with a local printer to do such. One thing that I am concerned about is the image quality when dabbling in larger sizes. I run the stock Inspire 1 w/ stock camera, I shoot in RAW. Any information and or the point in the right direction would be help, thanks!
 
Assuming you are using the Zenmuse X3 not the X5 it shoots 12MP stills with a resolution of 4,000x3,000 pixels. At 200 DPI you can get a 20"x15" photo, at 300 DPI you can get a 13.3"x10" photo see the chart below:
photo-enlargement-chart_orig.jpg
 
Here's another chart that may help, it only shows 11MP and 12.7MP but it will get you in the ballpark:
print-size-with-legend.jpg.aspx
 
Thank you! I'm trying to find a good printing company to help me out... I wonder if there is any way to get a good quality at a larger size? I've heard of optimization but I'm unsure how that works?
 
I've found that if you're going to print a large picture, that you should resize it in Photoshop to the size you're going to print it and use a good DPI as above. Photoshop does a really good job at interpolation when resizing the image and it will come out much better than just giving the print shop the original file and blowing it up during printing. And then tweak detail and sharpening and you can get something useful.

Only issue with the above is that your file size is going to be HUGE!

Even with that though, the image quality from the original X3 is not like from a DSLR and isn't really that good for printing that large of a size. It will be ok if the viewers of the print will be 6 feet or more away.
 
The place I use for printing you have to send your portfolio to them and they will either approve to print pictures for you or not. There are several places on the internet that will print any bodies work. Steve makes some good points about resizing in ps or lr before you send it off to print. If using the x3 I wouldn’t go to large with the photo size if it is going to be looked at closely like Steve made reference to.
 
These would likely be canvas wall art, viewed often times 4 - 6 feet or more in distance from the photo. Ideally I would like to print one of my more recents on a larger frame, more of a landscape style setup.
 
I'd recommend you check out Bay Photo which is north of Santa Cruz, CA for professional printing. They can print on most anything up to 96 inches in length and around 42-48" wide. I have had them do metal glossy prints and the things look like water is on the surface as it is very flat and shiny being on aluminum plate. They do canvas and acrylic prints as well as printing on maple wood I've been to their lab in Scotts Valley and it's in the old Seagate Hard Drive building and it is huge. When you see metal prints there 8 feet tall, you've seen impressive stuff. I've found the frames they can supply are cheaper than local frame shops so I let them do that too. Send some test prints and see.

Bay Photo Lab — Professional Photo Printing | Digital Prints, Photo Canvas, MetalPrints, ThinWraps, Albums, Books, ROES

While that's a grand idea... I live on the East Coast so shipping would not be worth the cost.
 
They will ship anywhere and it is reasonable. Bay photo, Whitehouse Custom Color (WHCC), H&H, American Color Imaging (ACI) are all great professional labs and ship all over North America very reasonably.
Remember that it isn't just resolution to be concerned about. The larger you go the more any imperfection will show. Labs suggest having a resolution of 300 ppi on your photos but like stated above it is very dependent on viewing distance what acceptable resolution is. I print many 30x40 photos at 100-150 ppi which look great. I know large billboards are printed at extremely low resolution but because of viewing distance they look great. Just make sure the original is a good crisp photo.
 
  • Like
Reactions: LevitatedMedia
Before printing something large it is a good idea to send in the print as a smaller size (8x10) to make sure Color and brightness are correct. If you are not using a calibrated monitor what you are seeing on your monitor can be Way off from what will print. The professional labs will get in touch with you if something looks really wrong but don't know what the photo is supposed to look like so if things are a little off they can't tell.
 
a few personal tips

1) when enlarging, don't just increase the image size in photoshop, use a plug-in that applies "stair interpolation" SI. That will do a series of small 2-4% increases and force the computer to crunch the data and will generate a significantly better end result.

2) proof it in PS, and convert it from RGB to CMYK, you'll have a better idea of how it's going to come out.

3) calibrating a monitor with a sensor was all the rage years ago but monitors typically don't require constant calibration. but crank up the monitor brightness.

4) get the labs print settings. Almost every lab has unique settings for each specific machine and those profiles are available online. Apply the correct profile to the image file and your prints will be significantly better. Even Costco and large facilities have their printer profiles available.

5) bigger sensors give better results but back in the old days we did A3 and A4 prints at 300dpi With a Nikon D1x and D2h that shot 3mp or less. You can do a lot in PS post production to improve the quality of an image and get it ready for large high quality prints.
 
My printing company, Redipix.com, performs custom enlargement in Photoshop, then sends you free printed proofs at 5x7 size both the full image and a part of the image at full final magnification. I have printed 16x20 from my I1 X3 and they turn out great. We ship anywhere in the US at our UPS cost.

David
 
A few thoughts...

Color mode (RGB or CMYK) should be as requested by the printer. All your image manipulation should be in RGB which is the native color mode for your camera. If going to an offset press (like a magazine printer would use), the image would be CMYK but for most poster-type large format printing, definitely RGB. The RGB will be converted as needed by the printer (device, not person).

For up-sampling an image, Photoshop is not ideal. There are many programs that leave PS in the dust this way. Mathematical algorithms rule when interpolating. The best I've found is PhotoZoom Pro. I've used this for doing trailer wraps, an especially demanding task since it's a billboard-size image that can be viewed from a foot away. You can't get away with anything at that distance!

Each professional print lab will have profiles of their printers. Get the ones you need from the lab. They should have them available to download. (Even Costco does this for each store's photo print lab.) Use those profiles when doing the color editing in Photoshop, then save the image as specified by the photo lab.
 
  • Like
Reactions: Tom Dillon
Depending on your subject you can always stitch images. Good for wide-open vistas and panoramas. This increases puxel count and definition. I quite happily produce images 30" wide at 300/in with phenomenal detail.
 
Lots of good advice above. To reinforce some and add a bit:

I too have had great results using Bay Photo. I'm on the east coast too, and even with shipping costs I find them cost effective. I'm a commercial photographer and I regularly get 24" to 48" wide acrylic and metal prints for customers from Bay Photo, with great results. I've recently had to request rush jobs from them, and their customer service was excellent.

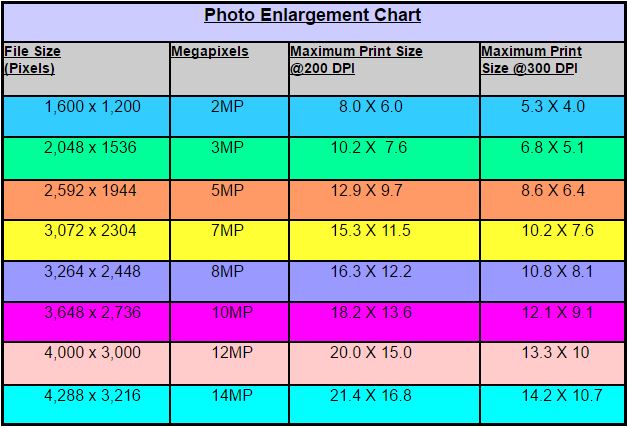
There's a pretty direct relationship between the pixel dimensions of your image file, and the largest print you can make from it that will look sharp. If you want to make a very good quality print there should be at least 300 pixels for each inch of printed output, in each dimension. So if you want to print something 20" wide, your image file should be at least 6000 pixels wide. For some types of images (softer ones like foggy scenes) and for softer/nonglossy print finishes such as canvas or rag, you can sometimes get away with as few as 200 pixels per inch. So you can make a 20" print of such an image from a file that's only 4000 pixels wide. Basically, anything over 300 pixels per printed inch is likely to be fine, and anything unde 200 pixels per printed inch is probably going to look softer/fuzzier than you want. Anything between those two values will be a judgement call.

If you have the X3 camera then your stills are around 4000 pixels wide, so making prints over 20" wide is pushing it (as that provides only 200 pixels per printed inch). However you have two options as mentioned above. You can either stitch multiple images together, to get more source pixels in your image file. Or you can use software to synthesize more pixels before giving the file to the printer (or ask your print vendor to do that for you).

For stitching I recommend the products from kolor.com: Autopano Pro or Autopano Giga (I use the latter). Although some people get fine results with the stitching features in LR and/or PS I find APG much more powerful and efficient. For synthesizing more pixels I'll second Rivers' recommendation of PhotoZoom Pro. It is much better at preserving detail and crisp edges than enlarging the file in photoshop or LR, even using the SI enlargement technique mentioned by Pyler above.

Hope the above is helpful. These are some of the key concepts I use when making large prints from drone images for commercial clients, and they work me.
 
You folks are all fantastic, thank you for the incredible bit of information you've provided. Now it's time to just soak it all in hahah! To those who have printed, what size would you recommend for a 3910 x 2196 photo as shown below?

Edit : The file size is too large to post here unfortunately so I had to upload to one of those free image hosting sites because I couldn't direct link to the image on my website....


Nubble Lighthouse 7
fxA4hb
 
Check coloramaphotolab.com Houston tx can give you up to 20x30 now but csn go up to 40x60 if you provide volume custom process color correction if needed
 

Members online

No members online now.

Forum statistics

Threads
22,295
Messages
210,754
Members
34,541
Latest member
abseilerstu