

Hi Guys,
I wanted to share my experience with you regarding the Inspire 2 motor mounts.
I first became aware of the potential for failure through this forum. Thanks to the community for the diligence to get the word out.
I originally had an Inspire 1 and then an Inspire 2. Once I heard of the glue connection and looked into the catastrophic failures, however rare they may be, I needed to create some peace of mind for my own expensive aircraft.
Full disclosure, I am a licensed professional structural engineer with a Masters Degree in Engineering.
I use my I2 in my structural engineering company for structural inspections as well as with my other photography/videography company for cinematography, photo and video needs. The last thing I wanted was to find out that my motor mount was spinning on the arm, or worse, completely detached from it!
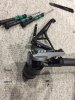
I broke out my tools and disassembled one of the mounts to take a look. Of course, I confirmed that the connection is strictly adhesive without any mechanical attachment. And I also confirmed that the end of the carbon tube is cut in a scalloped configuration instead of square cut.
I wanted to lock the motor mount on at a low cost and with a positive connection. I saw the other solutions out there and each of them had their own merits. So, I am definitely not taking anything away from anyone trying to find cost-effective solutions founded on sound engineering principles with an easy installation. Kudos to everyone taking the plunge to provide a solution.
I, on the other hand, took a different approach, mainly to preserve the beauty of the Inspire 2, while providing strengthened connections of the mounts...
I first did a quick calculation of the approximate stresses on the mount and determined that my intended solution would be many times stronger than necessary.
I broke out my painter's tape, Sharpie, cordless drill, 1/8" diameter bit, rivet gun, 1/8" aluminum rivets and aluminum rivet washers and dove in.
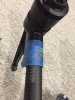
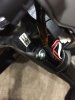
In a nutshell, I drilled through the mount and tube and riveted them together. I used a temporary piece of wood to back up the tube to protect the wires while drilling and, after riveting, I added permanent protection tape inside the tube to avoid wear on the wires.
Done.
Incidentally, I did get the idea from an obscure Chinese YouTube video I found on the topic. It was in Chinese, but I watched and it was clearly understandable.
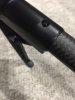
Once the mounts were reassembled, I dabbed the tops of the aluminum rivets with black paint and voila!
The irony is that aircraft have used rivets since the advent of aluminum in the airframe building process. Here we are again.
I wanted to share my experience with you regarding the Inspire 2 motor mounts.
I first became aware of the potential for failure through this forum. Thanks to the community for the diligence to get the word out.
I originally had an Inspire 1 and then an Inspire 2. Once I heard of the glue connection and looked into the catastrophic failures, however rare they may be, I needed to create some peace of mind for my own expensive aircraft.
Full disclosure, I am a licensed professional structural engineer with a Masters Degree in Engineering.
I use my I2 in my structural engineering company for structural inspections as well as with my other photography/videography company for cinematography, photo and video needs. The last thing I wanted was to find out that my motor mount was spinning on the arm, or worse, completely detached from it!
I broke out my tools and disassembled one of the mounts to take a look. Of course, I confirmed that the connection is strictly adhesive without any mechanical attachment. And I also confirmed that the end of the carbon tube is cut in a scalloped configuration instead of square cut.
I wanted to lock the motor mount on at a low cost and with a positive connection. I saw the other solutions out there and each of them had their own merits. So, I am definitely not taking anything away from anyone trying to find cost-effective solutions founded on sound engineering principles with an easy installation. Kudos to everyone taking the plunge to provide a solution.
I, on the other hand, took a different approach, mainly to preserve the beauty of the Inspire 2, while providing strengthened connections of the mounts...
I first did a quick calculation of the approximate stresses on the mount and determined that my intended solution would be many times stronger than necessary.
I broke out my painter's tape, Sharpie, cordless drill, 1/8" diameter bit, rivet gun, 1/8" aluminum rivets and aluminum rivet washers and dove in.
In a nutshell, I drilled through the mount and tube and riveted them together. I used a temporary piece of wood to back up the tube to protect the wires while drilling and, after riveting, I added permanent protection tape inside the tube to avoid wear on the wires.
Done.
Incidentally, I did get the idea from an obscure Chinese YouTube video I found on the topic. It was in Chinese, but I watched and it was clearly understandable.
Once the mounts were reassembled, I dabbed the tops of the aluminum rivets with black paint and voila!
The irony is that aircraft have used rivets since the advent of aluminum in the airframe building process. Here we are again.
Attachments
Last edited: